We have done a lot of fun activities at Mutual, so I thought I would share some here. We did Mormon Clue one night. You can find all the files to print out here: http://www.mormonshare.com/lds-clipart/mormon-clue-2
We wanted to mix up our young men and young women, so we randomly gave out name tags of famous couples. They then had to find their other half and that was their partner. It was really neat and everyone had fun.
Saturday, 30 April 2016
Saturday, 2 August 2014
Girls Camp
I was asked to go to Girls Camp this year as the stake leader over crafts. It was so much fun! Our theme was "Say OZ" where "OZ" stood for "On to Zion." We made these cute water bottles as a thank you gift for our YCL's.
For the crafts at camp, we made ruby slipper earrings or necklaces, scrabble tile necklaces, magnets, bottle cap key chains or necklaces, personalized notebooks, hemp bracelets, and braided headbands. We got great feedback on the crafts. I loved doing it!
Tuesday, 9 July 2013
Barefoot Baby Sandals
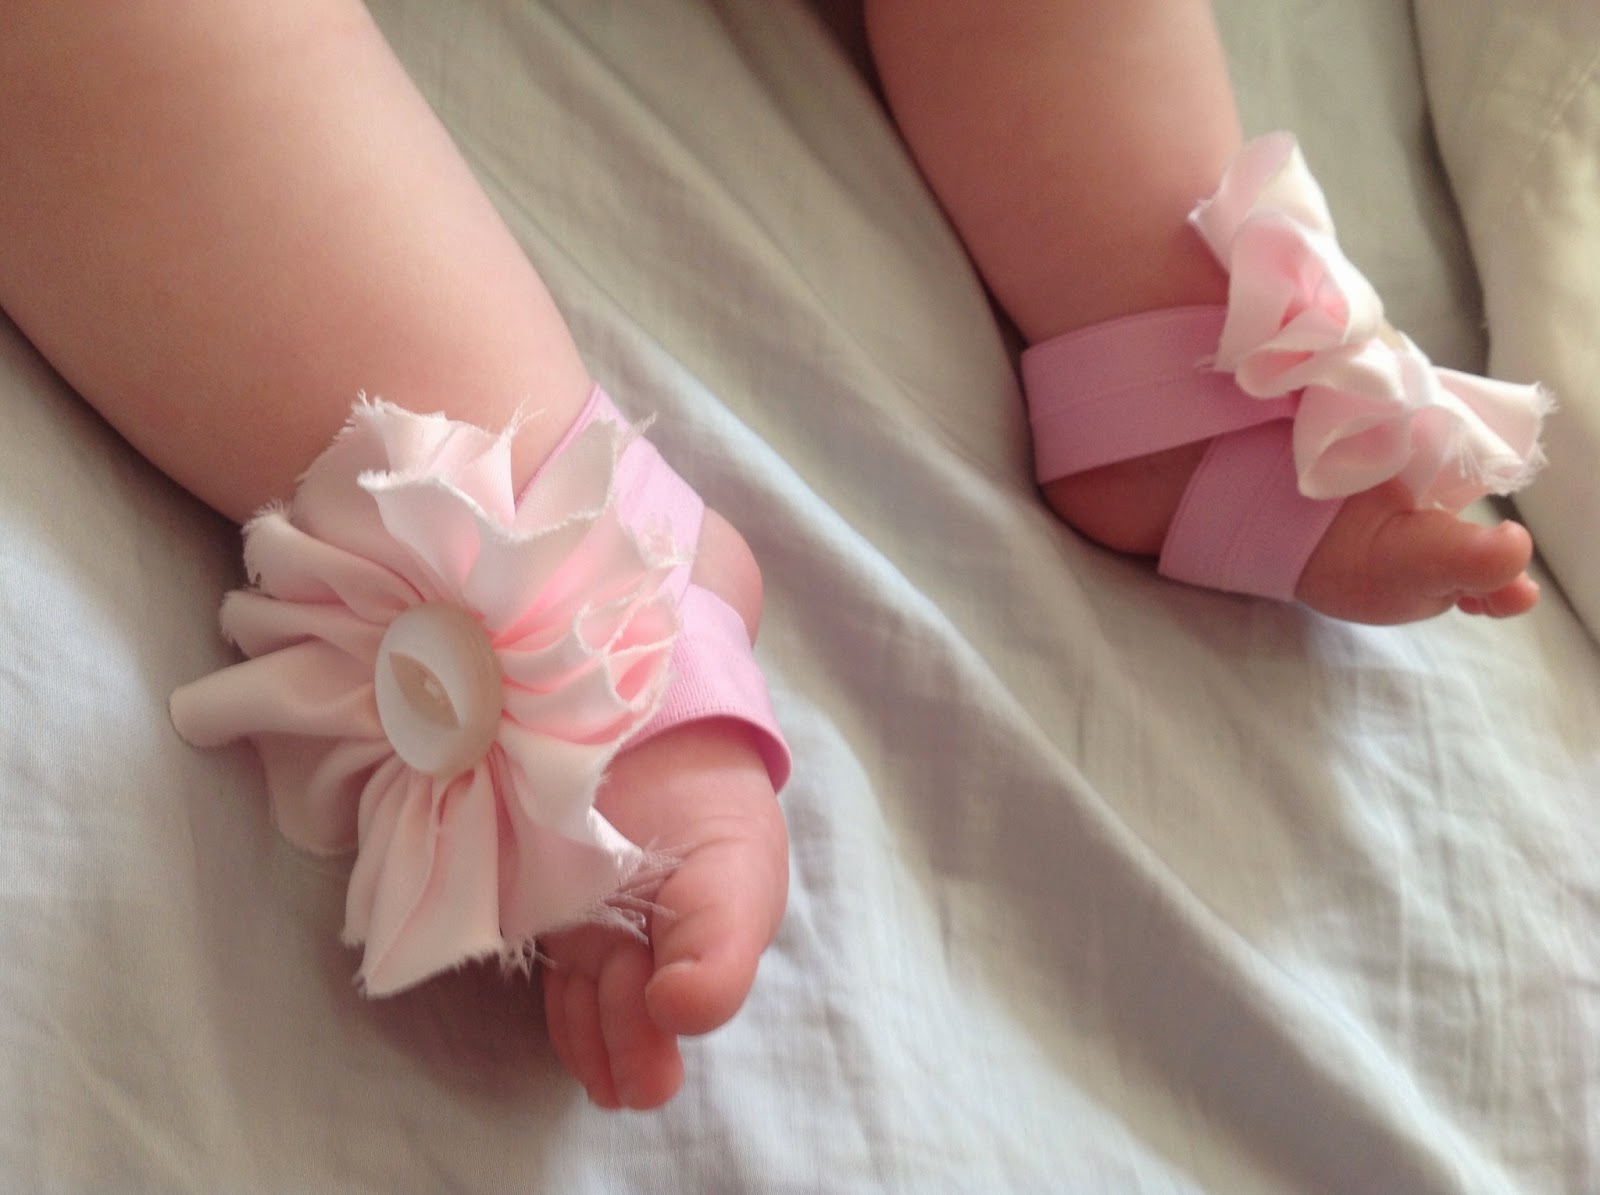
This morning I got an email for a deal on these cute little baby barefoot sandals. Since I have a baby, I was interested.
Aren't they adorable? When I clicked on the link, though, and saw that for $6.25 plus $2 shipping, I could own one pair of sandals, I thought again. I know, I know. That's not a bad price, but I'm cheap, and I started looking closer. I mean, come on, it is just elastic and a flower. Then I remembered this pink elastic I had bought last summer that I didn't end up using. Hmmmm. The wheels started turning. I had learned how to make some cute flowers out of fabric, so I grabbed my supplies. All it took was the elastic, fabric cut into a long strip, a button, and needle and thread. This is what they ended up like. I was very pleased. And because I had everything on hand, it didn't cost me a thing. In my rummaging, I also found some purple and green elastic, so I guarantee that I will be making more of these!
Friday, 5 July 2013
4th of July Blocks
We made these cute 2x4 blocks when my SIL and family came down for a visit. We love to craft together so I just printed this cute printable out on photo paper and cut the wood. We painted, mod podged, and added some ribbon. Even my 4 year old niece did one! So easy and cute!
Thursday, 2 May 2013
Chalkboard Placemats
I have another Pinterest party coming up, and this time decided to do something I've been wanting to do for a long time. When I did that craft fair, oh three years ago or so, one lady there was selling chalkboard placemats. I had never heard of chalkboard fabric, but thought that sounded pretty awesome. So I went online and ordered some. Now to be fair, I did try to make them. They just didn't turn out. I had a hard time with the chalkboard fabric bunching up when I tried to sew it. A few months ago, I saw a tip on Pinterest that said to put scotch tape over the sewing foot. It worked like a charm! I'm going to get some chalk to put in the pocket and they will be all set to go.
Thursday, 21 March 2013
Pinterest Party
I have a friend who is having a Pinterest party tomorrow. I am so excited to go and have been trying to figure out what I will make to take to it. I wanted to do something for springtime and finally settled on two wood projects. I made an Easter wood craft and a patriotic one as well. I think they turned out well. When I'm making something, I always worry it won't look good at the end. I have also noticed that a lot of crafts on Pinterest don't tell you how to make them, so I am including the dimensions for these crafts for any others who may want to make them and also for my own personal reference!
Fr the "He is Risen" one, I cut the first piece to 5", the second to 7", and the third to 9". I used the Monotype Cursiva font set at 3" for the letters. For the patriotic one, I used the Snickles font, also at 3". For the wood, I cut two pieces at 4", one at 8", and the last at 9". I just used 2x4 wood for all of them.
Labels:
Cricut,
wood craft
Monday, 11 March 2013
Cupboard Glass
My husband suggested to use the image I used on our privacy glass by our front door on our cupboard glass. We have a corner cupboard that has a glass front. I used my cricut to cut out the clear contact paper this time and that cut the prep time way down. I just set my cricut blade to setting 2 and medium pressure. It worked great! It doesn't completely block out the view of the inside, but I think it looks good and does what we wanted.
If you are interested in using the same stencil image, here it is. You can make it bigger (like I did by my front door) or smaller (like I did here).
Sunday, 30 December 2012
2x4 Snowmen
My girls were looking for something to do a few days ago, and we had three end pieces of wood from other projects I had done. I gave them to the girls and told them they could make snowmen out of them. They were excited and went right to work painting them white. I had some socks with holes that I was going to get ride of, but had decided to keep for projects. They picked some and we put them over the top and tied a ribbon around them for a hat. I cut the end off and then cut that piece in a circle, so it made a long piece and tied that around the bottom for the scarf. They painted the faces on and we were done! Such a quick and simple craft, and I think they are so cute!
Labels:
kid craft,
wood craft
Family Picture
I'm sure a lot of you have seen those huge pictures a lot of people have pinned on Pinterest that you can make for cheap. I wanted to check and see if I could really do it, and yes you can! I was ordering something on Staples, so I checked it out. You order an engineering print. I got the 2 foot x 3 foot size for about $3.50. I wasn't sure how it was going to turn out, but I figured for less than $4, it was worth trying. I got free delivery and it came quickly in a sturdy tube. Of course, it isn't on photo paper and they tell you not to do photos, but it turned out beautifully! I love it! I had seen on Pinterest that people would put them onto wood. That was cool, but I thought I would like to be able to switch out the picture now that I know how to get them for so cheap. So I went to Wal-mart and found a poster frame to fit it for $16. So for under $20, I have this huge family picture. I put it over our full-size keyboard upstairs, so you can see how big it really is.
My brother-in-law was thinking of all kinds of ideas you could use these for, like printing out a picture of your child for a birthday party and playing "Pin the hat on _____" (fill in child's name) or some other article of clothing or body part to pin onto the child's picture. You could decorate your walls with different pictures of your children for parties or anything!
Tuesday, 25 December 2012
Diaper Bag
I had been looking at cute diaper bags on Etsy for the past couple of months. They are so cute, but I just couldn't see spending almost $100 for a diaper bag that I could probably make. So I looked for some free patterns for bags and I found one I really liked. The tutorial was very detailed and it went very quickly. If you are interested, the site is here: http://www.warehousefabricsinc.com/blog/pleated-lined-handbag/
I picked a gray chevron pattern and used that fabric for the entire outside and just used a white material for the inside. I love it and can't wait to use it every day!
I also made a wipes case and burp cloth to match. They fit inside perfectly!
I picked a gray chevron pattern and used that fabric for the entire outside and just used a white material for the inside. I love it and can't wait to use it every day!
I also made a wipes case and burp cloth to match. They fit inside perfectly!
Sunday, 18 November 2012
Let the Christmas Crafts Begin!
I watched Elf a couple weeks ago with my kids for Friday night movie night. We love that movie, and when I saw a bunch of "Elf-type" crafts on Pinterest, I knew I had to make one! I love the quote, "The best way to spread Christmas cheer, is singing loud for all to hear." I am a huge fan of the 2 x 4 crafts. I think they are cute and so cheap. I have just never made one before myself. So here is my first 2 x 4 project. I love it! I actually ended up making two because we are doing a white elephant gift exchange at church in a couple weeks. I think this will be perfect. There has to be another Elf fan out there who would enjoy this as much as I do.
Labels:
Christmas,
vinyl lettering,
wood craft
Friday, 26 October 2012
Bouncy Seat Cover
I found this bouncy seat at a garage sale for $2 a couple months ago. It wasn't the prettiest to look at, but when I checked to see how much a newer, more neutral colored bouncy seat would cost, I decided I could just use some fabric I already had to make a cover for it. I finished it in less than two hours, start to finish. I was surprised it went so fast! I still need to spray paint the legs, but I wanted to share pictures and will add another later when the weather is nicer and I can get it painted.
Here is the fun before picture:
See, it had pretty "loud" colors. I found this cute black with white polka dot fabric I had in my collection and started cutting up. I did reinforce the holes for the straps. That was the only thing that took any time.
I think it will be perfect with the legs painted black, but I'm pretty pleased with it so far!
Update: Here is the final photo! I ended up painting the legs white. That's what I wanted to do originally because I thought the black would be too dark. I only worried that it wouldn't cover the blue. I found some primer+paint in a spray can, so that was perfect and covered the blue just fine.
Here is the fun before picture:
I think it will be perfect with the legs painted black, but I'm pretty pleased with it so far!
Update: Here is the final photo! I ended up painting the legs white. That's what I wanted to do originally because I thought the black would be too dark. I only worried that it wouldn't cover the blue. I found some primer+paint in a spray can, so that was perfect and covered the blue just fine.
Thursday, 25 October 2012
Dresser Redo #2
Remember when I said I was going to have to redo my younger daughter's dresser as well, only with pink zebra stripes? Well, I finally got around to doing it yesterday. It went a lot quicker than the other dresser, because it was smaller and I didn't need to strip it. I love the new primer + paint they have out now. It sure makes painting a lot easier.
Here's a look at what it looked like before. The handles were awful. I like it much better now. It's definitely brighter and more fun!
Thursday, 4 October 2012
Privacy Glass
We have this weird window to the left of our front door that was clear as day and let in tons of light. I felt like everyone in the neighborhood could look inside, though I'm sure it wasn't that bad. This is what it looked like.
It's so bright here, right? Well, hubby went to the store to see how much the privacy film stuff costs. Well, it started at over $30! I told him not to buy it because I had seen this awesome idea on Pinterest I wanted to try. So I bought a roll of clear contact paper for $5 and started tracing and cutting out my pattern. It took a few hours, but the end result was worth it. I love it! And when the sun shines in now, it leaves a cool pattern on the wall too!
I know it's at night but with the sun shining in, I just couldn't get a good picture to show you the pattern. I do love it and it works great!
It's so bright here, right? Well, hubby went to the store to see how much the privacy film stuff costs. Well, it started at over $30! I told him not to buy it because I had seen this awesome idea on Pinterest I wanted to try. So I bought a roll of clear contact paper for $5 and started tracing and cutting out my pattern. It took a few hours, but the end result was worth it. I love it! And when the sun shines in now, it leaves a cool pattern on the wall too!
I know it's at night but with the sun shining in, I just couldn't get a good picture to show you the pattern. I do love it and it works great!
Dresser Redo
I finished this last month and just haven't posted it yet. This used to be my old dresser. My mom had given it to us last year and I hadn't had time to finish it before everything got packed up and put into storage.
My daughter is using it now. We decided to do the drawer fronts in a green zebra print. I just printed out some zebra print and freehanded it onto the drawers, just looking at the printout as a guide. The great thing was that when we put the drawers all back in the dresser, the stripes actually match up and look like I planned it! She loves it and I'm so glad it is done, looks good, and we have a solid, functional dresser. (Now my other daughter wants me to do hers in pink zebra stripes!)
Tuesday, 5 June 2012
Circle Skirt with Flower Hair thing to match!
I have found the best skirt tutorials on pinterest! The circle skirt is by far my favorite. It is so fast and looks so cute on my girls. I followed this tutorial on Made's blog. With the extra fabric, I made flower hair ties to match. This is one of my favorite skirts that I made. I need to get some better pictures, but this will do for now.
Thing 1
For Dr. Seuss day this year (yes, it was a while ago), my daughter needed a costume. I didn't want to spend much money on it and we decided to do Thing 1. I got some red sweat pants and a red shirt, cut out a white felt circle and wrote "Thing 1" on it, and then worked on her wig. I just bought some bright blue yarn, crocheted a kind of headband/beanie type thing to fit her head, and then tied a bunch of blue yarn "hair" to it. I thought she looked cute, though she was embarassed to wear the wig at school, so it didn't stay on for very long.
CTR Towel
I needed a quick and easy gift for a nephew's baptism, so I found this tutorial on the Rachel Berry Blog. So I whipped up two (I have a neice who will need one soon!) and they turned out great! I attached the poem below and tied it up with a ribbon. Easy as pie!
My Baptism Towel
This baptism towel is to help remind you
Of your baptism day all the years through.
When you come out of the water all clean and pure,
Dry off with this towel and you can be sure,
That you are as clean as this towel is white.
And the Holy Ghost will be with you both day and night.
For the Holy Ghost is your gift after the laying on of hands,
And will be a comfort and a guide if you obey God's commands.
This CTR emblem will help remind you to be strong
As you continue to learn right from wrong.
When your towel becomes soiled, remember that we, too,
May sometimes make mistakes and we've been taught just what to do.
Just as you can wash your towel so it can again be clean,
The wrongs you make can be washed away and never again be seen.
Your Heavenly Father loves you, remember always to pray,
And He will be beside you for forever and a day. "
Sunday, 22 May 2011
Bookmarks
I saw an idea for cute bookmarks that I wanted to try. They turned out really well. My kids were so excited to get new bookmarks! It was very simple to do with my Cricut. Using my Sure Cuts a Lot program, I welded together 2 basic shapes and cut those out. I cut out letters in a contrasting color and glued it to the bookmark which I folded in half where they are welded together. I added a magnet so the bookmark can be held together over a couple pages. I think adding a ribbon onto the end would also be a nice touch. Super quick and easy to do.
Monday, 25 April 2011
Homemade Bread
I have had so many people ask me how I make my homemade bread, that I thought I would just show you how on here. Here are two things to remember. First, it is super easy. Don't think too much about it. Second, do not be scared of yeast. The worst that can happen is it won't rise. It's ok. You'll do better the second time.
This is a very basic recipe that you can change to cinnamon rolls, cinnamon swirl bread, or add some herbs for any number of variations. It only uses six ingredients and everyone should have them and keep them in food storage. Then you'll know you can always make bread. And believe me, you can live on bread. When I make it, we often just have bread for dinner cuz that's all everyone wants to eat. It is it's best right out of the oven, but it is also great toasted with cinnamon sugar or jelly on top. It also does well for grilled cheese sandwiches or french toast. Ok, so here it is:
2 cups warm water (not hot, just warm)
1 Tbsp. yeast
1/2 cup sugar
1 1/2 tsp. salt
1/2 cup oil
6 cups flour
Put them in a mixing bowl (I use my Kitchen Aid but you can use just a regular mixing bowl and mix by hand.) in the order I put them in. **Note: I am not an exact measuring person. I use a heaping half cup and the flour is whatever. Don't worry about it. :) Use your dough hook or mix with wooden spoon until it is all mixed and pulls away from the side. If using a stand mixer, I just set it on the lowest setting and put away all my ingredients and by then it is done. This is what is should look like.
Cover with a towel and let rise until doubled. I will mix in the morning before I head out to do errands and then by the time I come home for lunch, it is ready. It will look something like this.
Now dump it onto the counter and start kneading it down. Punch it, roll it. Get all the air out.
Now cut it into three equal pieces. Use a knife--do not pull it as it will break apart the properties of the yeast.
Form each ball into a bread loaf and place in greased bread pan. Cover and let rise. (A few hours)
Preheat oven to 350 and then bake for 20 minutes or a few minutes longer until golden brown.
Remove from pans. I just place mine on the kitchen towel I have been using when covering them while rising.
I like to butter the tops right when they come out of the oven. Just gives them a little extra flavor! Hope this helps. Please comment if you have any questions or if you try it out. Tell me what you think! Enjoy!
This is a very basic recipe that you can change to cinnamon rolls, cinnamon swirl bread, or add some herbs for any number of variations. It only uses six ingredients and everyone should have them and keep them in food storage. Then you'll know you can always make bread. And believe me, you can live on bread. When I make it, we often just have bread for dinner cuz that's all everyone wants to eat. It is it's best right out of the oven, but it is also great toasted with cinnamon sugar or jelly on top. It also does well for grilled cheese sandwiches or french toast. Ok, so here it is:
2 cups warm water (not hot, just warm)
1 Tbsp. yeast
1/2 cup sugar
1 1/2 tsp. salt
1/2 cup oil
6 cups flour
Put them in a mixing bowl (I use my Kitchen Aid but you can use just a regular mixing bowl and mix by hand.) in the order I put them in. **Note: I am not an exact measuring person. I use a heaping half cup and the flour is whatever. Don't worry about it. :) Use your dough hook or mix with wooden spoon until it is all mixed and pulls away from the side. If using a stand mixer, I just set it on the lowest setting and put away all my ingredients and by then it is done. This is what is should look like.
Cover with a towel and let rise until doubled. I will mix in the morning before I head out to do errands and then by the time I come home for lunch, it is ready. It will look something like this.
Now dump it onto the counter and start kneading it down. Punch it, roll it. Get all the air out.
Now cut it into three equal pieces. Use a knife--do not pull it as it will break apart the properties of the yeast.
Form each ball into a bread loaf and place in greased bread pan. Cover and let rise. (A few hours)
Preheat oven to 350 and then bake for 20 minutes or a few minutes longer until golden brown.
Remove from pans. I just place mine on the kitchen towel I have been using when covering them while rising.
I like to butter the tops right when they come out of the oven. Just gives them a little extra flavor! Hope this helps. Please comment if you have any questions or if you try it out. Tell me what you think! Enjoy!
Subscribe to:
Posts (Atom)